Welcome to Your Decadent Chocolate-Covered Strawberry Cheesecake Adventure!
Hey there! If you’re looking to impress your friends or just treat yourself to something seriously delicious, you’ve stumbled upon the right recipe! This Chocolate-Covered Strawberry Cheesecake is not only stunning to look at, but it’s also creamy, decadent, and perfect for any celebration. I promise, once you make this cheesecake, it will become your go-to dessert for special occasions. So, let’s dive in and make something unforgettable!
Nutritional Benefits of This Cheesecake
Believe it or not, there are some health benefits to this indulgent cheesecake! Strawberries are packed with antioxidants, vitamins, and minerals. They are known to aid in heart health, lower blood sugar levels, and even boost your immune system. Plus, when you make this cheesecake at home, you control the ingredients, so you can keep it a little healthier without losing flavor or fun! Swapping full-fat cream cheese for a lower-fat option or using less sugar can make it a tad lighter, too.
Fun and Adaptable Variations
- Fruit Swap: Not a strawberry fan? You can replace the strawberry puree with other fruits like raspberries or blueberries for a twist!
- Nutty Crust: Try adding ground nuts to the crust for a different texture! Almonds or pecans work wonderfully.
- Vegan Version: Need a vegan option? Use a dairy-free cream cheese alternative and substitute eggs with flax eggs or applesauce.
- Flavor Boost: Want a flavor kick? Add a splash of lemon juice in the batter for a zesty surprise!
Chocolate-Covered Strawberry Cheesecake Recipe
Ingredients
- 1 ½ cups Oreo cookie crumbs
- ½ cup unsalted butter (melted)
- 2 cups cream cheese (softened)
- 1 cup granulated sugar
- 1 teaspoon vanilla extract
- 1 cup sour cream
- 3 large eggs
- 1 cup strawberries (pureed)
- 4 oz dark chocolate (for ganache)
- 1 cup heavy cream (for ganache)
- Fresh strawberries (for topping)
- Powdered sugar (for dusting)
Step-by-Step Instructions
- Preheat the Oven: First thing’s first—let’s get that oven preheating to 325°F (160°C). This helps set everything just right.
- Prepare the Crust: In a mixing bowl, combine the Oreo cookie crumbs with melted butter until well mixed. Press this mixture firmly into the bottom of your springform pan to form a crust that will hold all that creamy goodness! Bake in the preheated oven for 10 minutes, then let it cool.
- Mix the Cheesecake Batter: In a large mixing bowl, beat the softened cream cheese until it’s super smooth and creamy. Gradually add in the granulated sugar, mixing until everything is combined. Toss in the vanilla extract and sour cream—keep mixing until it’s lovely and smooth!
- Add the Eggs: Add the eggs, one at a time, mixing on low speed just until they’re incorporated. Take care not to overmix—this is key to a silky texture!
- Incorporate Strawberry Puree: Now, gently fold in the strawberry puree until it’s evenly distributed. The color is going to be beautiful!
- Pour into Crust: Pour this luscious cheesecake batter over the cooled Oreo crust, spreading it evenly across the top. It’s looking good already!
- Bake the Cheesecake: Bake for about 55-60 minutes. You’ll know it’s ready when the edges are set but the center is still slightly jiggly. Turn off the oven and crack the door ajar, letting it sit inside for about an hour; this helps prevent cracks.
- Cool the Cheesecake: Let it cool to room temperature before transferring it to the refrigerator. Chill for at least 4 hours—or overnight if you can wait!
- Make the Ganache: In a small saucepan, heat the heavy cream over medium heat until it’s just about to simmer. Remove from heat and mix in the chopped dark chocolate, letting it sit for a few minutes before stirring until smooth and glossy.
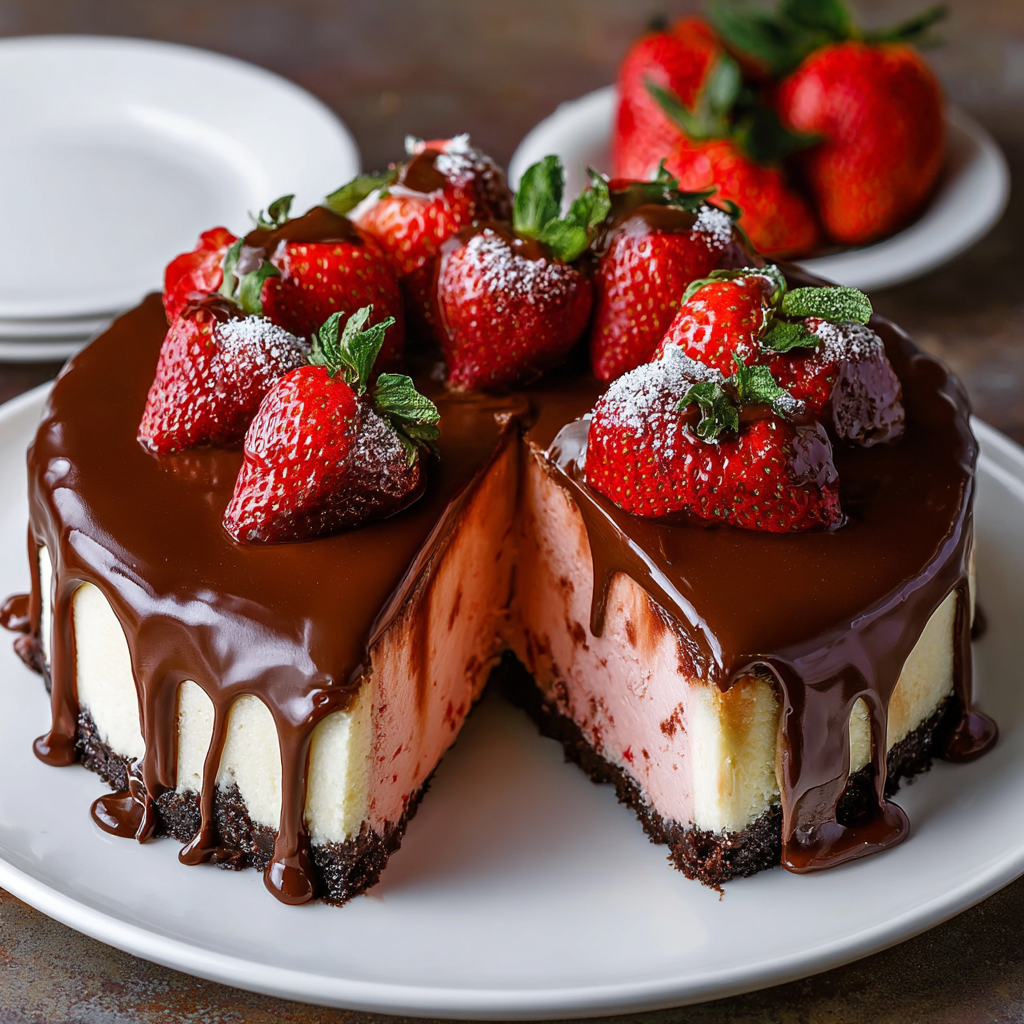
- Top the Cheesecake: Once the cheesecake has chilled, pour that gorgeous chocolate ganache over the top and let it drizzle down the sides. YUM!
- Add Fresh Strawberries: Decorate with fresh strawberries on top, and give it a light dusting of powdered sugar for that wow factor!
- Serve: Slice it up, serve chilled, and enjoy every delightful bite of your masterpiece!
Practical Tips to Make Your Cheesecake a Success
- For easy slicing, dip your knife in warm water before cutting through the cheesecake.
- If you want to avoid cracks, remember to bake it slowly and don’t rush the cooling process.
- Store leftover cheesecake in an airtight container in the fridge for up to 5 days—if it lasts that long!
- Freeze slices individually wrapped in plastic wrap and placed in a freezer-safe container for delightful treats down the road.
Equipment Needed
Here’s a quick checklist of what you’ll need to whip up this cheesecake:
- A springform pan (perfect for easy removal!)
- A mixing bowl and a whisk or electric mixer
- A measuring cup for liquids and a measuring spoons set
- A small saucepan for the ganache
- A spatula for mixing
- A knife and cutting board for serving
Frequently Asked Questions
- Can I make this cheesecake a day in advance? Absolutely! In fact, it often tastes better after sitting overnight in the fridge.
- What if I don’t have a springform pan? You can use a pie dish, but be careful when slicing as it won’t come out as easily.
- Can I use a different crust? Yes! You can try a graham cracker crust or even a nut-based crust for a gluten-free option.
- How can I tell when the cheesecake is done? Look for set edges and a slightly jiggly center. It will firm up as it cools.
- What should I do if the cheesecake cracks? Don’t panic! You can cover it with ganache or whipped cream to hide any imperfections.
Let’s Connect!
Have you made this decadent Chocolate-Covered Strawberry Cheesecake? I’d love to hear how it turned out for you! Don’t forget to snap a picture and share it on Pinterest. Happy baking, and here’s to sweet celebrations!